The Last Blade 2 Continue Service
Introduction
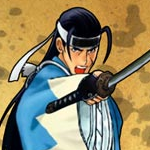
Washizuka is a solid mid to upper mid tier character. The A version of his fireball is good, his Dm is great for punishing ground and air recoveries and he's fairly quick. He has high low links and some very safe block strings in speed/ex since he can switch high to low at any time in his chain combos. He is the only real charge character in the game and as such has issues dashing in and punishing things or starting combo off a dash. Dash in 5A for instance. Most times he will toss a fireball but there are ways around it like using 4A or 2C to start combos.
He is best in speed but he can be played effectively in any mode. In power he's more dangerous mid screen and in ex he can finish his bnb speed chain combos with a Dm for more damage. The damage tradeoff in Ex isn't worth it in my opinion but if it works for you then go for it.
Moves List
Washizuka has no real useless normals or specials.
- Unique to him: His B+C unblockable in power mode can be held longer than other characters. It has 2 levels. Level 1 is no charge to about 2 seconds and does 61 base damage. Level 2 is slightly longer (just before he turns red) and does 76 base damage. Level 2 will travel almost full screen but will only hit from about 2/3 screen. Level 2 version can be supercanceled for BIG damage. Like most unblockables you won't use them much but it is there.
- numbers shown for +/- are if the move is done alone and not cancelled or chained to anything else if applicable. Read it as startup frames | active frames | recovery frames
Normal Moves
Standing attacks
- 5A: 7f | 1f, 1f | 14f
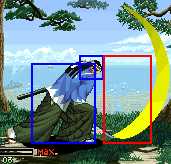
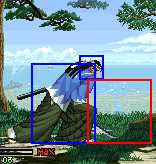
Vertical slash. Has good range and is decent as a poke. 2nd active frame has slightly more range. Always cancelable. Links to 4A and 2C. +7/-7,+8/-7 power +7/-8, +8/-7 speed/ex
- 4A: 3f | 2f | 16f
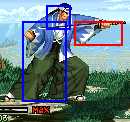
Somewhat less range than 5A but still very good. Combo tool. Your go to move for punishing since it's quick. Cancels in all modes and links to itself. Punishable in speed/ex if you don't chain out of it or cancel into anything, chances are that will never happen though. +5/-7 power +5/-10 speed/ex
- 5B: 12f | 4f | 28f
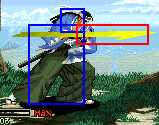
Horizontal Stab. Good range on this. Causes recoil if blocked in power. Cancels in all modes and mainly used in speed combos. Always cancel it with something for safety/combos -3/-10 power -3/-23 speed/ex
- 6B: 19f | 1f | 32f power, 13f | 1f | 32f speed/ex
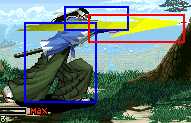
Similar to Standing B but has more range and comes out slower. Cannot be canceled in any mode and can only combo in speed chains. -3/-13 power -3/-23 speed/ex
- 5C: 9f | 3f | 22f
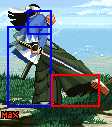
Short ranged low kick. Hits mid so it can be blocked either way. Cancels in all modes. -2/-17
- 6C: 9f startup | 3f active | 25f recovery
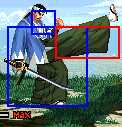
Horizontal kick. Causes wall bounce on hit. Can be canceled in power and can be linked after near the corner in all modes with his "flash kick" move or 214 A/B or DM in some situations. -/-19
Crouching attacks
- 2A: 3f | 4f | 17f
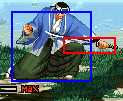
Has slightly more range than 4A. Cancels in speed/Ex. Used mainly in speed chains. Hits mid despite looking like a low. +2/-7 power +2/-13 speed/ex
- 2B: 14f | 1f, 1f | 26f
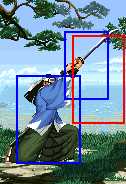
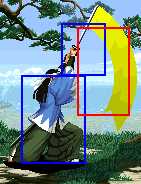
Less range than it's standing counterpart. Has 2 hitboxes with minor changes in frame data. One or the other will hit, not both. In speed/Ex it does more damage in than standing B. Used mostly in chain combos. Cancels in all modes. Can be used as anti air. On guard in power you go into a reeling animation. +1 /-10, +2 /-10 power, +1 /-19, +2/-18 speed/ex
- 2C: 5f | 4f | 12f
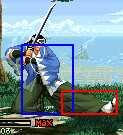
Has slightly more range than crouching A. Cancels in speed/Ex. His main low-high mixup/combo tool. Really good combo starter as it is a low. Links to itself and 4A. +7/-8
- 3C: 11f | 3f | 17f
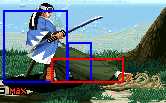
Sweep. Used mostly in chain combos for mixup. Hard knockdown on hit. Cancel into 214B for meter or pressure. -/-11
Jumping attacks
- A: 6f | 2f, 2f | -
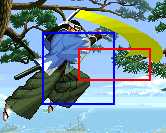
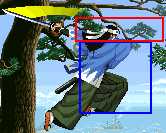
His best air to air. 2 part attack but only 1 will hit. Decent range and is almost horizontal. You'll be using this quite a bit since there is a lot of air poking in LB2. 2nd part of the attack can cross up if you do a low jump forward. You gotta be quick to combo after it though so practice. The japanese player TAK uses this out of corners sometimes.
- B: 12f | 4f | -
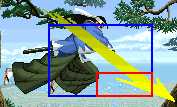
Used for jump ins mostly. Hits at a downward angle and isn't that great for air to air. Don't abuse it in jump ins or you'll get deflected and punished.
- C: 3f | 7f | -
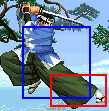
His most used jump in. Not great air to air but can work in some situations. It's main use is for crossups and is more reliable as a jump in than B. Lots of active frames too. Multiple low jump forward C's can be annoying sometimes. Again don't abuse it to much or you will eventually get deflected and punished. Sometimes good to use for a crossup attempt after a close low attack. example 2C, low jump forward delayed C.
Special Moves
- (b) f + A/B
Wave type projectile. A version fires one, B version fires two. A version can be used in combos.
- (d) u + A
11f | 1f | 36f
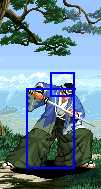
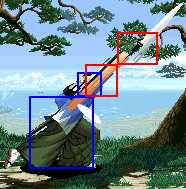
Charge time is 24 frames. Your basic anti air at about a 70 degree angle. Use in combos if you want. -/-28f
- (d) u + B
14f | 3f | 43f

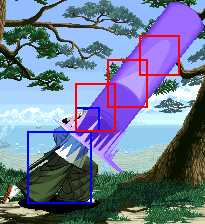
Charge time is 38F. More vertical range than A version at the same angle. Does more damage but comes out slower. Useful in combos or after his BC overhead in speed/ex if you want. It can connect after an air to air parry if you hold d after you parry then press u + B when you land. -/-37f
- qcb + A/B
Quick horizontal stab type attack. You can mash the buttons for more hits. Both versions can be used in combos and the B version (1st hit only) can be linked after if you are close. B version is useful in block strings and as a long ranged poke.
- (b) f + C
Noted as Shoulder charge in the combos section. Charge time is 24f. Can be super canceled in power mode, in ex mode the dm won't combo after the shoulder. Has 3 follow ups:
- (b) f + C > qcf + C
Leaping stab. Must be blocked high. use as a mixup if opponent is crouch blocking.
- (b) f + C > qcf + B
Low stab. Knocks down on hit and must be blocked low. Use as a mixup occasionally if opponent is blocking standing up.
- (b) f + C > qcf + C
Horizontal attack. Knocks down on hit, can be blocked high or low. Main combo tool and it can be super canceled in both power and EX. Use everytime the shoulder connects and is not blocked.
Super Moves
DM: qcb f + AB
15 hit rush DM. 20f startup. Can combo normally after B attacks, and after a super cancel in power/ex otherwise. Good in combos but don't throw it out randomly.
SDM: qcb f + B
Single strike for big damage. 58f at fastest release. Becomes unblockable and does more damage if held for 99f or more. Cannot be used in combos. Best bet is to use it after a ground to air deflect (timing is important here) or sometimes as a meaty after a knockdown f + C in power mode. Not to useful overall.
Speed combo specials/super speed combos. I put them here since they are basically another super move/DM in speed/ex mode
- d d + A/B
- A > B > C > A > B > C > A > B > qcf + C
- A > B > C > A > B > C > C > B > qcf + A (The qcf + A is unblockable. Opponent can air recover after the uppercut.)
- A > B > C > d + C > A > BC > A > qcf + B (If opponent ground recovers you can punish with a combo of your choice.9
- A > B > C > d + C > A > d + C > f + BC (Last hit is unblockable and cancelable.)
Most of the time you'll be using the 2nd or 3rd ones as they do more damage than the first. The last one can be used if your opponent is blocking your speed combo high and isn't good at deflecting during the attacks. If you are low on life use his Dm after the launch, otherwise use the B version of his anti air.
The Basics
Washizuka is the Guile ish, or bette said, Dee Jay ish character of the game, he is an all around heavy hitter character with an objective to hit the character with his shoulder charge special and commonly plays ground.
He also had decent air normals that fits well in the meta game, common weakness will be that is too vulnerable if he fails his main special, try to use mash up sword slashes if you feel beign thread with a footsie opponent.
Air poking
Since Lb2 is big on air pokes,this a small list of what attacks will work to your favor. You have "airsies" in Lb2 as opposed to footsies in 3rd Strike for example. You need to learn this to be successful. Generally air attacks have good priority, especially low jump attacks.
If you opponent is above or next to you use A. If they are below you use C. You can try to use B if they are below you as well but it's angle makes it wierd in the air. If you're having trouble guaging where exactly your opponent is in the air just stick with A for best results.
Combos
All the combos listed can start with any jump in. Use a cross up C for best results. Also end combos with an otg downforward+B or standing C otg. In any combo that has Down+C listed use Down-back+C so you are charging his specials. The power combos can all end with qcb+B(mash)for good damage if you can't get the shoulder charge to connect.
Speed mode combos will work in Ex mode. Any other combo listed will work in any mode as long as there is not a cancelled Forward+C. Super cancel combos listed for power mode will work in Ex.
-> is a link and , indicates a chain. xx is cancel into
Power mode
- Down+C -> Back+A xx shoulder charge, QCF+C. His BnB in power, If you have meter or are low on life supercancel the qcf+C into his DM
- A -> Back+A -> Back+A xx shoulder charge, any followup
- Down+C -> Back+A(x2/3) xx weak fireball. If you use 2 Back+A's use the shoulder charge instead
- A -> Down+C -> Back+A xx shoulder charge, any followup. A good High-low combo. The A -> Down+C link can be tricky at first.
- Down+C(x2/3) -> Back+A xx weak fireball. Use shoulder charge instead if you used 2 Down+C's
- Forward+C xx QCB+B (1 hit) Works almost anywhere.
- Forward+C xx anti air A/B. Corner/near corner. For this to work hold down for a second, press forward+C, then tap up+A/B. If you have your opponent right in the corner you need to cancel the forward+C, from a little further out it's easier to link the anti air.
- Forward+C xx DM. This one is wierd. You need to hit them with the end of Washizuka's leg for this to work. It can work from nearly anywhere (but not full screen) if your spacing is good. More for style then anything else.
- Down+C(x2) -> Back+A xx Anti Air A/B. Hold Downback for the down+C's, Back+A, tap Up+A/B. I use this one a lot even though his BnB is MUCH more reliable. Use whatever works for you.
- Back+A x2/3 xx anti air B. Hard but very possible. To pull this off do the back A's as (Hold down-back, back+A)x2/3 up-back+B. You must use down-back between the back A's. if you you use down, the next back A will come out as qcb+A. Really not that useful but it is flashy.
- B+C(hold until he flashes red)xx DM, qcb+A/otg power mode only
Speed mode
Remeber you can start these with a crossup A or C or a normal jumoing B. Crossup C is the best option usually.
- Back+A, A, down+A, down+B xx forward+C, qcf+C, otg down-forward+B or standing C xx qcb+A (wiff) for meter
Bnb in speed mode. hold Back for the standing attacks and then downback for the crouching attacks so when you press forward+C you get the shoulder charge.
- Back+A, A -> Back+A, A, down+A, down+B xx forward+C, qcf+C. otg
Alternate bnb. The link isn't all that hard but if you are having trouble stick with the first combo.
- Back+A, A -> Back+A, A, A, B xx forward+C, qcf+C. otg
Sometimes you need to use this version if you are a bit far from the opponent. Again just hold back during the sequence to get the shoulder charge.
- Down+C->Back+A,Bnb of choice.
the link off of down+C is really good since it gives him a low combo starter. LEARN IT.
- Down+Cx1/2 -> down+A xx anti air B or Charge back forward + C, qcf+C.
Good if you need a quick knockdown. He has much better options off of a down+C though. I use this mainly because I like the way it looks.
- Back+A, A -> Down+C -> Back+A, A, A, B xx forward+C, qcf+C. otg
The A-> down C link is tricky at fitrst. use this one if you want to.
- dashing B, B/down+B xx forward+C, qcf + C, otg or dashing B, B/down+B, B+C, qcb+b (use anti air B in a corner)
Hold back as soon as the Dashing B connectect and this will work. for the second one just hold down until the Overhead animation is done, then press up+B
- Back+A, A, Down+A, Down+B, B+C -> qcb+B or anti air B if opponent is cornered.
The special move after the overhead is technically a link since you can't cancel overheads. You won't have any trouble with it.
- Back+A, A, Down+A xx qcb+B -> Back+A, A, A, B xx forward+C, qcf+C, otg
Works on everyone in a corner. Midscreen it works crouching characters and a standing Kagami for one reason or another. Most damaging combo he can do in speed mode without a speed combo special. If you start with a jump in you need to do a short dash before the first Back+A for it to work. Using less hits before the qcb+B makes it easier so do what works for you. Standing/crouching C xx qcb+B works well for this.
- 2Cx3/4 xx 46C 236C 3B/5C otg
- 4A, 5A -> 4A, 5A, 2A, 2B xx 2146AB (corner)
- Short chain into standing/crouching B xx qcb,forward+AB. The Dm won't combo if you are to far out. If you want to combo it off of a Down+C starter, do Down+C -> Back+A, A/down+A, B/downB xx qcb,forward+AB. Followup the Dm with an otg or qcb+A. Both do the same damage. These will work anywhere
EX mode
Ex mode combos are basically anything you can do in speed mode + super cancels. For Washi, any combo ending with charge 4,6C, 236C can be super canceled to his Dm for more damage. Example:
- 4A, A -> 4A, A, 1A, 1B xx 46C, 236C, 2146AB, 3B/214A followup.
You get the idea.
- Deep jump in B, short dash, 4A, A, 2A xx 214B -> 4A, A, A, B xx 46C, 236C xx 2146AB, 214A/3B.
The most practical damage he can do in any combo in any mode. 170ish damage. A fully charged unblockable canceled into his Dm in power mode actually does 6 points more damage with an otg followup but you will almost never hit that in a match vs a human opponent.
Advanced Strategy
Gameplay
He's best on speed, but he can be used effectively on power.
As the only true charge character in the game, and because of the ease with which moves are buffered in LB2, Washizuka has one problem unique to him. It's difficult for him to dash in and punish someone without tossing a fireball by accident, because you usually hit back to stop the dash in time to avoid doing a dash attack. You can remedy this by starting combos with 2C or hitting back and then letting it go to neutral and doing smaller combos with 5A starters to punish instead. You could also cancel the dash with 2 instead and then go into 4A, but that takes a little bit longer and you might accidentally buffer a 214A. You can remedy that by doing 4A+C as it will not let a special come out.
Aside from that, he's a solid upper mid-tier character. He's got a great fireball, and his anti-air and DM can be used to punish air recoveries. His DM is also great off a ground-air parry.
He's got some of the safest speed combos in the game since he can switch to high/low within his combo at any time, or end with his quick multi-slash move (keep it to one hit most of the time unless you're absolutely sure it's going to hit). This doesn't mean you should just blitz somebody mindlessly with combos, but it does mean that if you do mess up and go too far into one, you can probably get out of it safely.
4A,5A,3Cxx214A/B is probably his safest block string. You can also do 2 or 3 214A/B's one after the other pretty safely, but I would do this very sparingly.
His ability to start combos off his 2C also means that he gets a lot of use out of running under someone jumping straight up and jump-cancelling into his low on the other side. Again, watch out for people with good cross-ups when you do this.
He can link in and out of a lot of his stuff, but most of his long link chains aren't all that practical. That being said, none of them are especially difficult besides the multiple 4A's, and the multiple 2C's. The ones you see in combo movies using shoulder-> 4A are pretty much impossible to use in actual play. they only work if the shoulder charge stuns the opponent so it wont come up much if at al. The only ones you'll likely see in a tournament situation though, are his 2C starters and his double 4A,5A.
Jump A is his best air-air and air C is a good cross-up/jump-in tool.
He moves really far forward if you charge his unblockable up until he's flashing, making it more difficult to evade than most, but not a whole lot safer.
If you're using him in power, his mid-screen game gets a lot more dangerous because of the high damage on 214A/B
Match-Ups
Source: https://wiki.supercombo.gg/w/Last_Blade_2/Washizuka
0 Response to "The Last Blade 2 Continue Service"
Post a Comment